Unfold in reverse order
For a folded sheet, each fold creates a mirror axis. A punched hole on one layer may produce multiple holes after unfolding. Unfold the most recent fold first, reflecting the punch across that fold line, then undo earlier folds. If a square is folded vertically once, a punch away from the fold produces two symmetric holes. If folded vertically and then horizontally, a typical punch away from both fold lines produces four holes. A punch on an axis may overlap its reflection, so count distinct final positions rather than blindly doubling.
Coordinate shortcut
Imagine the original square has x and y coordinates. A vertical centre fold maps x to its reflected coordinate across the centre line; a horizontal fold maps y similarly. The distances from the fold line are preserved. In a diagram showing a punch 2 cm from the vertical fold, its partner lies 2 cm on the opposite side. This is safer than choosing a visually plausible option by eye. Check whether the paper is folded left onto right or right onto left if marked corners are present.
Mirror-image questions
A vertical mirror reverses left and right but retains top and bottom. A horizontal water reflection reverses top and bottom. Letter-like or arrow-like asymmetrical features reveal the difference. Trace two labelled points: the leftmost point becomes rightmost in a right-side mirror, while their vertical levels stay the same. Do not rotate the page; rotation changes both the orientation and the relative order differently from reflection.
Option audit
Eliminate choices that have the wrong number of holes or wrong side of the axis. Then check pairwise symmetry and exact spacing. For a mirror option, confirm every feature, not just the most prominent arrow. These questions require the supplied diagrams; when practising, keep the image fully visible and zoom rather than inferring from the option label alone.
Practice — 50 questions
Attempt every item before reading the answers below. Figure questions require the printed or on-screen diagram.
1. A square sheet of paper (10 cm × 10 cm) is folded once from left to right, as shown. A pin is then punched through all the folded layers at the point marked in the second figure, which is 3.5 cm from the vertical fold line and 8.4 cm from the top edge. If the paper is now unfolded completely, which figure shows the resulting pattern of holes?
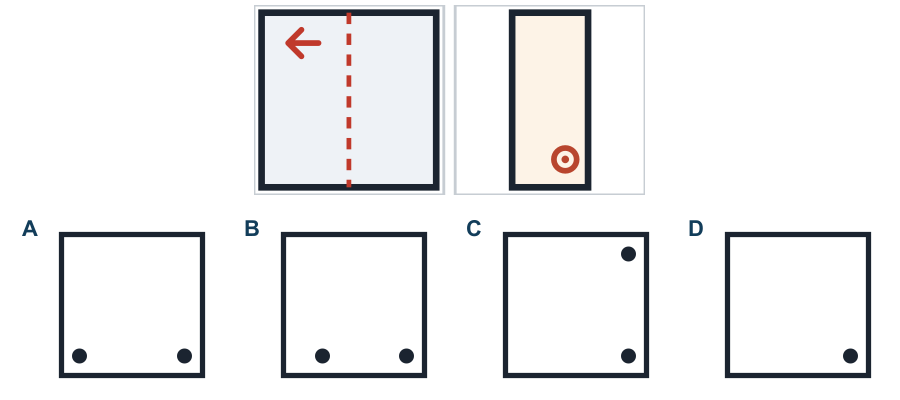
2. A square sheet of paper (10 cm × 10 cm) is folded once from top to bottom, as shown. A pin is then punched through all the folded layers at the point marked in the second figure, which is 1.1 cm from the left edge and 3.5 cm from the horizontal fold line. If the paper is now unfolded completely, which figure shows the resulting pattern of holes?
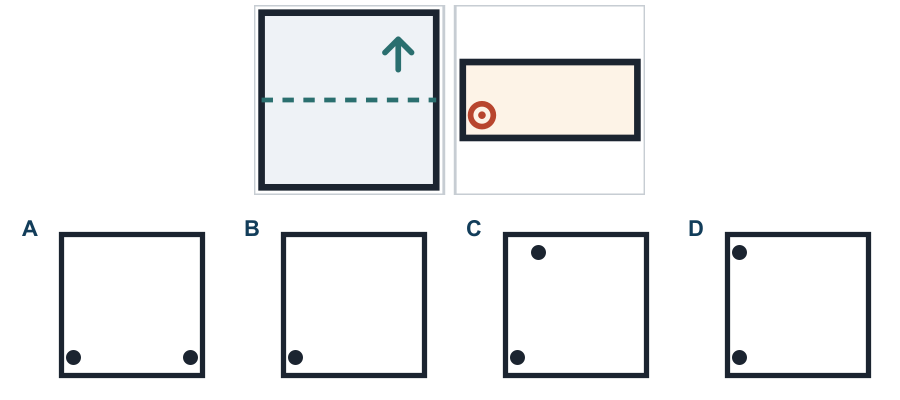
3. A square sheet of paper (10 cm × 10 cm) is folded once from left to right, as shown. A pin is then punched through all the folded layers at the point marked in the second figure, which is 2.7 cm from the vertical fold line and 4.4 cm from the top edge. If the paper is now unfolded completely, which figure shows the resulting pattern of holes?
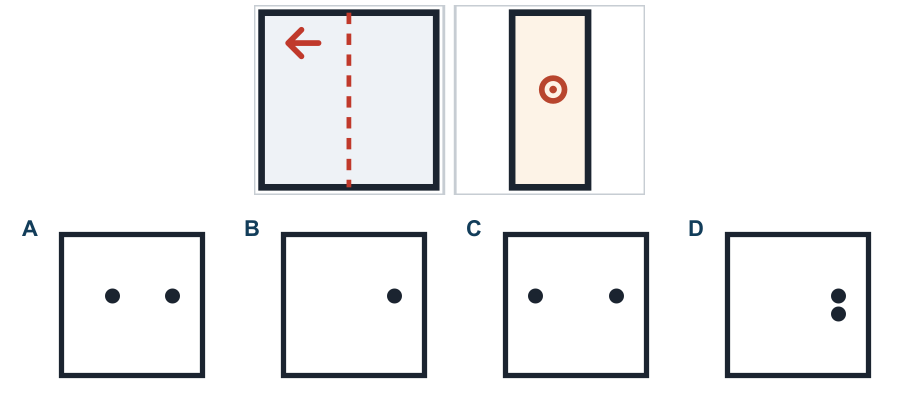
4. A square sheet of paper (10 cm × 10 cm) is folded once from left to right, as shown. A pin is then punched through all the folded layers at the point marked in the second figure, which is 3.6 cm from the vertical fold line and 1.8 cm from the top edge. If the paper is now unfolded completely, which figure shows the resulting pattern of holes?
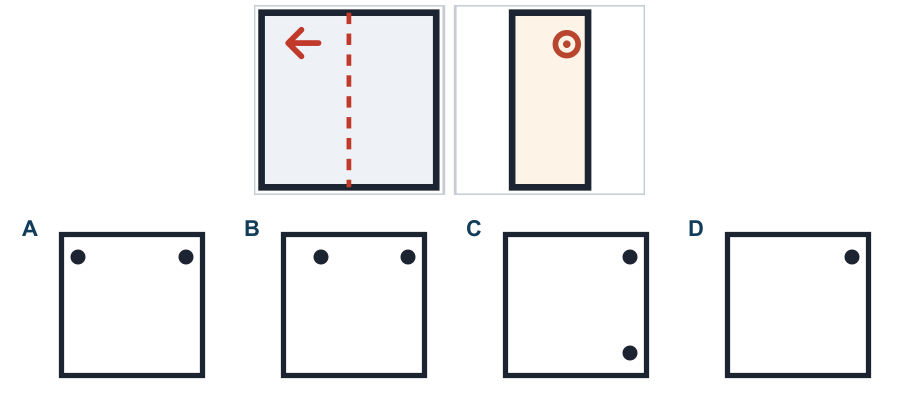
5. A square sheet of paper (10 cm × 10 cm) is folded once from left to right, as shown. A pin is then punched through all the folded layers at the point marked in the second figure, which is 3.3 cm from the vertical fold line and 5.4 cm from the top edge. If the paper is now unfolded completely, which figure shows the resulting pattern of holes?
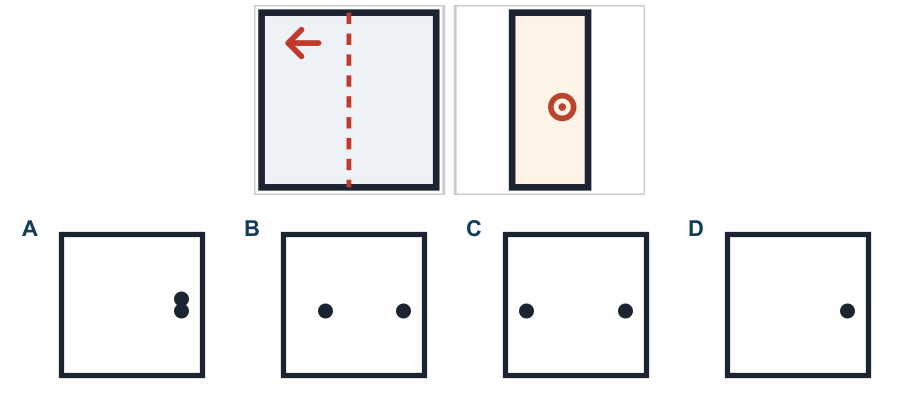
6. A square sheet of paper (10 cm × 10 cm) is folded once from left to right, as shown. A pin is then punched through all the folded layers at the point marked in the second figure, which is 2.8 cm from the vertical fold line and 1.0 cm from the top edge. If the paper is now unfolded completely, which figure shows the resulting pattern of holes?
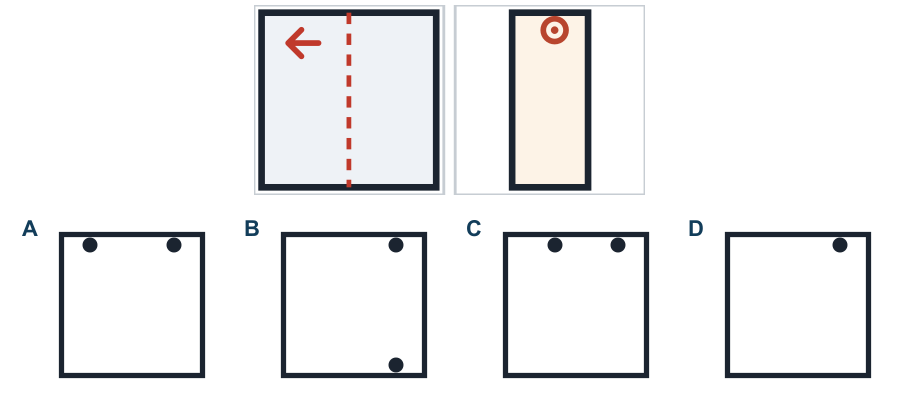
7. A square sheet of paper (10 cm × 10 cm) is folded once from top to bottom, as shown. A pin is then punched through all the folded layers at the point marked in the second figure, which is 8.3 cm from the left edge and 2.7 cm from the horizontal fold line. If the paper is now unfolded completely, which figure shows the resulting pattern of holes?
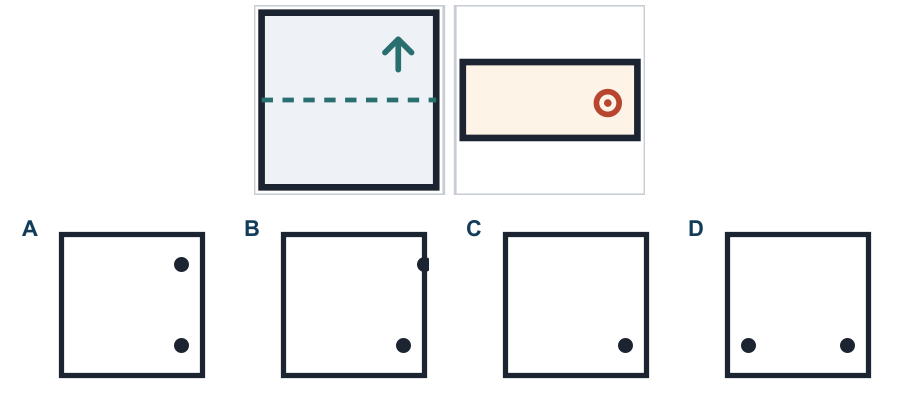
8. A square sheet of paper (10 cm × 10 cm) is folded once from left to right, as shown. A pin is then punched through all the folded layers at the point marked in the second figure, which is 3.0 cm from the vertical fold line and 4.0 cm from the top edge. If the paper is now unfolded completely, which figure shows the resulting pattern of holes?
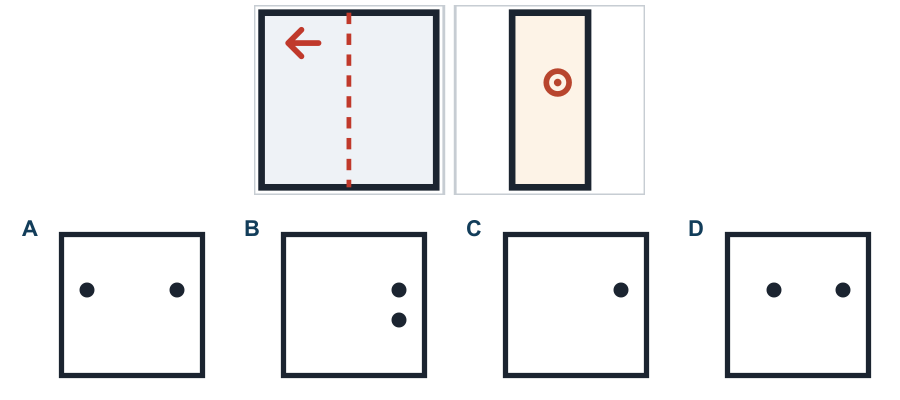
9. A square sheet of paper (10 cm × 10 cm) is folded left to right, and then top to bottom, as shown. A pin is then punched through all the folded layers at the point marked in the second figure, which is 2.9 cm from the vertical fold line and 2.3 cm from the horizontal fold line. If the paper is now unfolded completely, which figure shows the resulting pattern of holes?
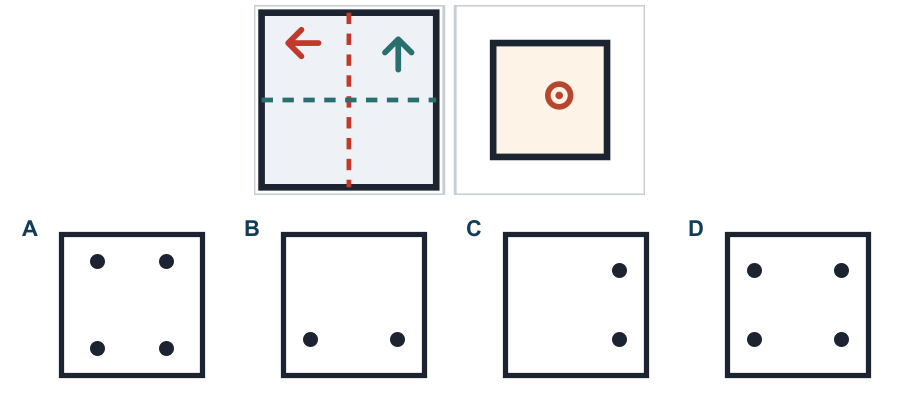
10. A square sheet of paper (10 cm × 10 cm) is folded left to right, and then top to bottom, as shown. A pin is then punched through all the folded layers at the point marked in the second figure, which is 3.2 cm from the vertical fold line and 2.7 cm from the horizontal fold line. If the paper is now unfolded completely, which figure shows the resulting pattern of holes?
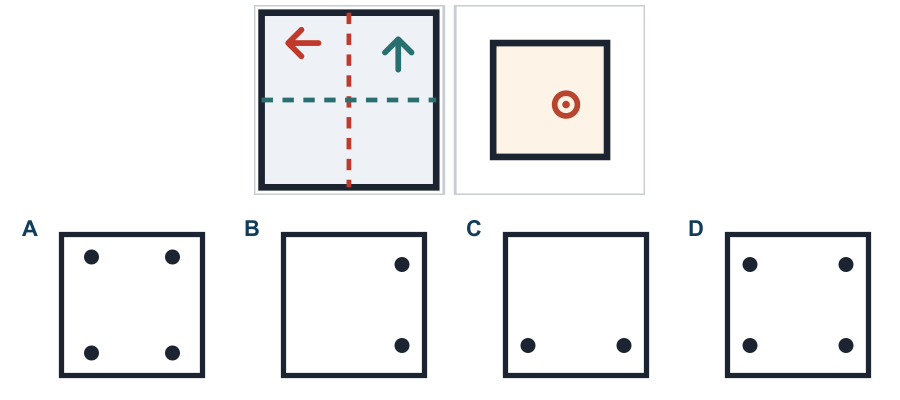
11. A square sheet of paper (10 cm × 10 cm) is folded left to right, and then top to bottom, as shown. A pin is then punched through all the folded layers at the point marked in the second figure, which is 2.6 cm from the vertical fold line and 1.8 cm from the horizontal fold line. If the paper is now unfolded completely, which figure shows the resulting pattern of holes?
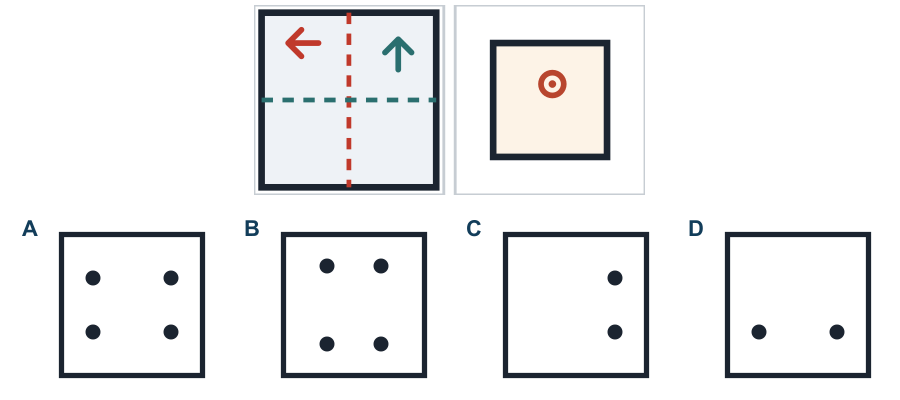
12. A square sheet of paper (10 cm × 10 cm) is folded left to right, and then top to bottom, as shown. A pin is then punched through all the folded layers at the point marked in the second figure, which is 2.3 cm from the vertical fold line and 2.7 cm from the horizontal fold line. If the paper is now unfolded completely, which figure shows the resulting pattern of holes?
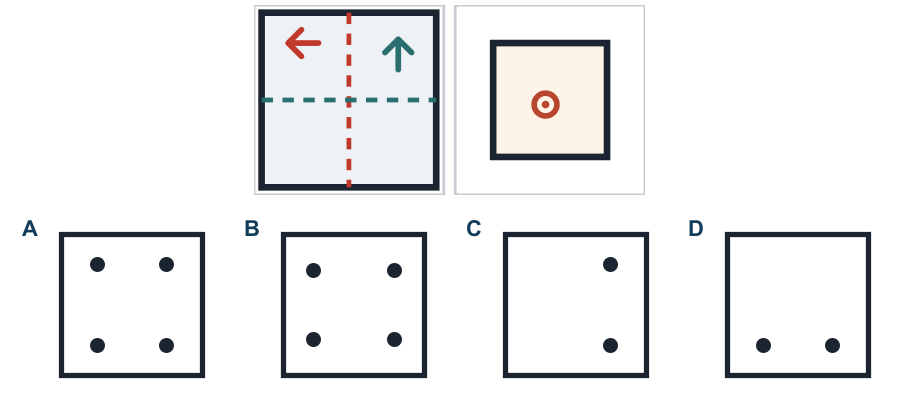
13. A square sheet of paper (10 cm × 10 cm) is folded left to right, and then top to bottom, as shown. A pin is then punched through all the folded layers at the point marked in the second figure, which is 2.1 cm from the vertical fold line and 2.1 cm from the horizontal fold line. If the paper is now unfolded completely, which figure shows the resulting pattern of holes?
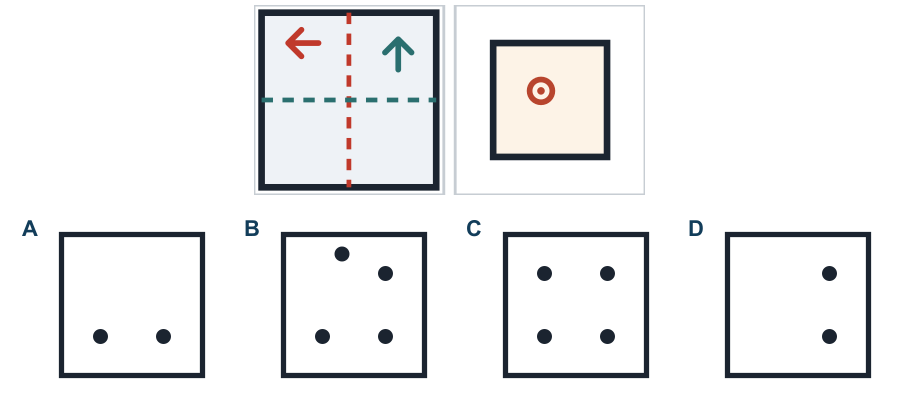
14. A square sheet of paper (10 cm × 10 cm) is folded left to right, and then top to bottom, as shown. A pin is then punched through all the folded layers at the point marked in the second figure, which is 2.9 cm from the vertical fold line and 2.9 cm from the horizontal fold line. If the paper is now unfolded completely, which figure shows the resulting pattern of holes?
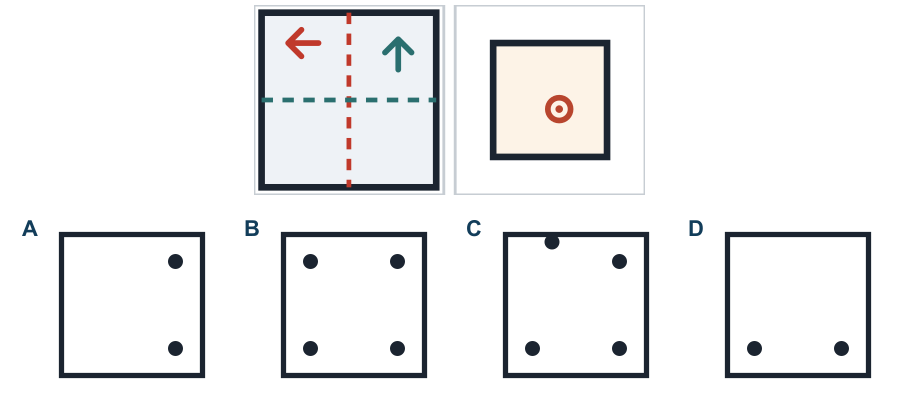
15. A square sheet of paper (10 cm × 10 cm) is folded left to right, and then top to bottom, as shown. A pin is then punched through all the folded layers at the point marked in the second figure, which is 2.7 cm from the vertical fold line and 2.1 cm from the horizontal fold line. If the paper is now unfolded completely, which figure shows the resulting pattern of holes?
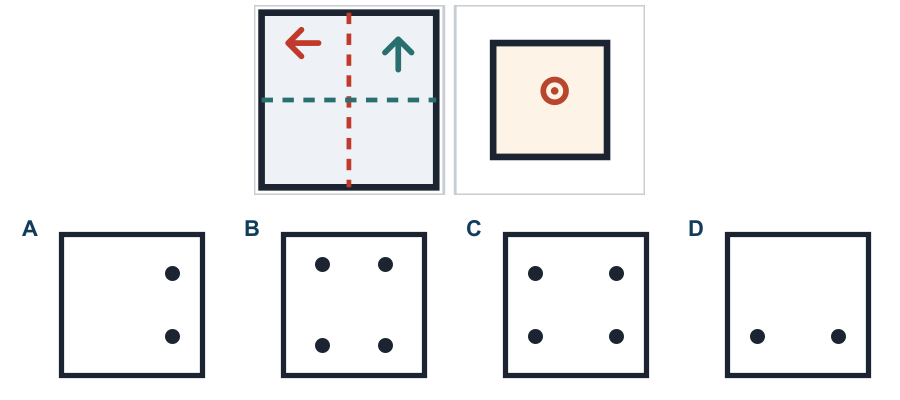
16. A square sheet of paper (10 cm × 10 cm) is folded left to right, and then top to bottom, as shown. A pin is then punched through all the folded layers at the point marked in the second figure, which is 2.9 cm from the vertical fold line and 2.1 cm from the horizontal fold line. If the paper is now unfolded completely, which figure shows the resulting pattern of holes?
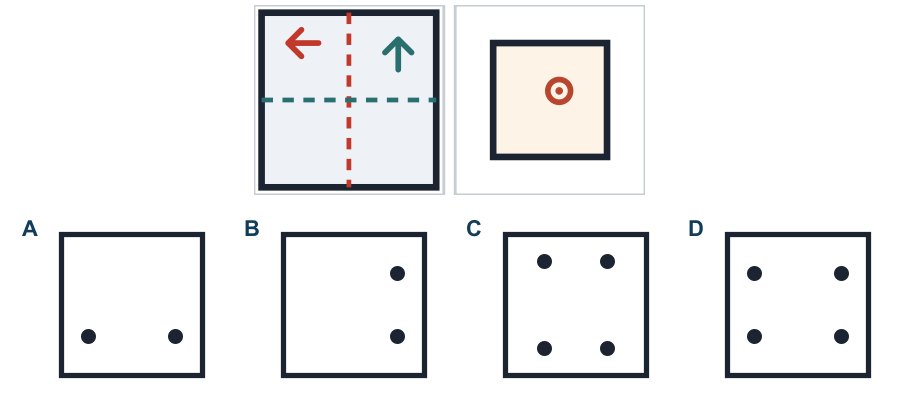
17. A square sheet of paper (10 cm × 10 cm) is folded left to right, and then top to bottom, as shown. A pin is then punched through all the folded layers at the point marked in the second figure, which is 2.3 cm from the vertical fold line and 3.1 cm from the horizontal fold line. If the paper is now unfolded completely, which figure shows the resulting pattern of holes?
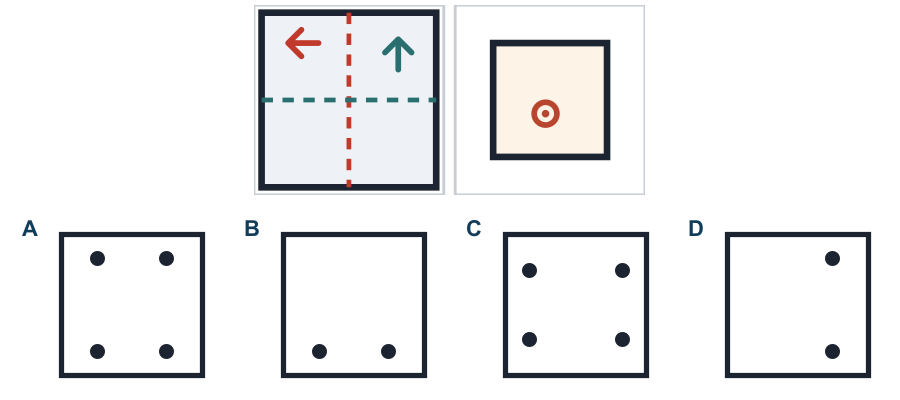
18. A square sheet of paper (10 cm × 10 cm) is folded left to right, and then top to bottom, as shown. A pin is then punched through all the folded layers at the point marked in the second figure, which is 1.9 cm from the vertical fold line and 2.7 cm from the horizontal fold line. If the paper is now unfolded completely, which figure shows the resulting pattern of holes?
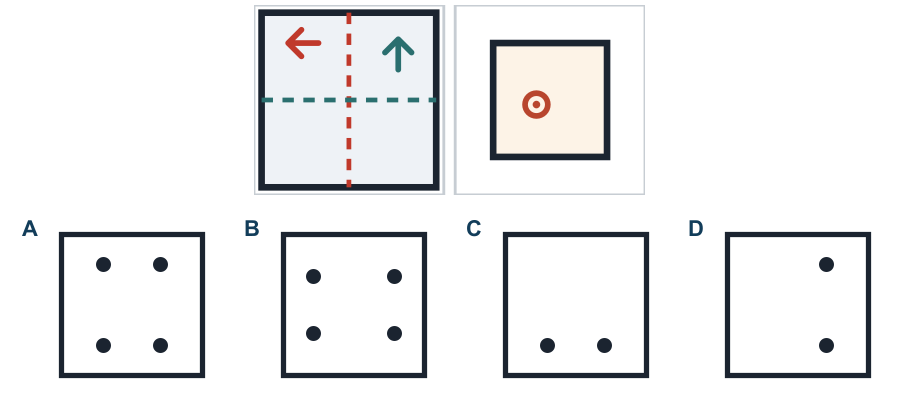
19. A square sheet of paper (10 cm × 10 cm) is folded left to right, and then top to bottom, as shown. A pin is then punched through all the folded layers at the point marked in the second figure, which is 2.6 cm from the vertical fold line and 2.1 cm from the horizontal fold line. If the paper is now unfolded completely, which figure shows the resulting pattern of holes?
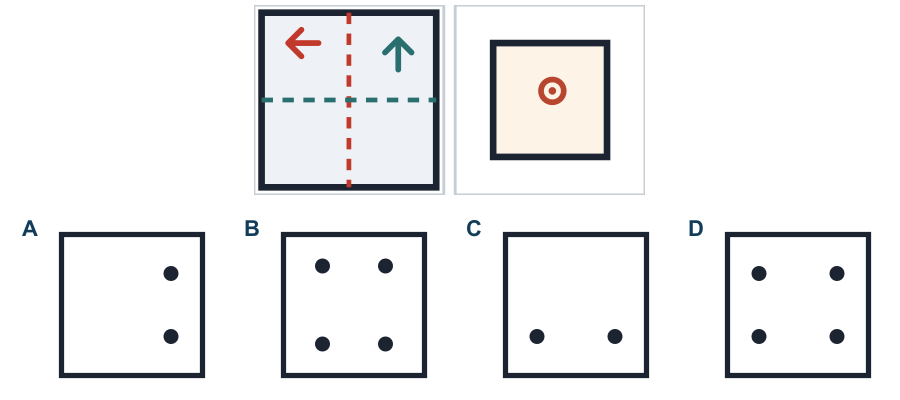
20. A square sheet of paper (10 cm × 10 cm) is folded left to right, and then top to bottom, as shown. A pin is then punched through all the folded layers at the point marked in the second figure, which is 3.4 cm from the vertical fold line and 2.1 cm from the horizontal fold line. If the paper is now unfolded completely, which figure shows the resulting pattern of holes?
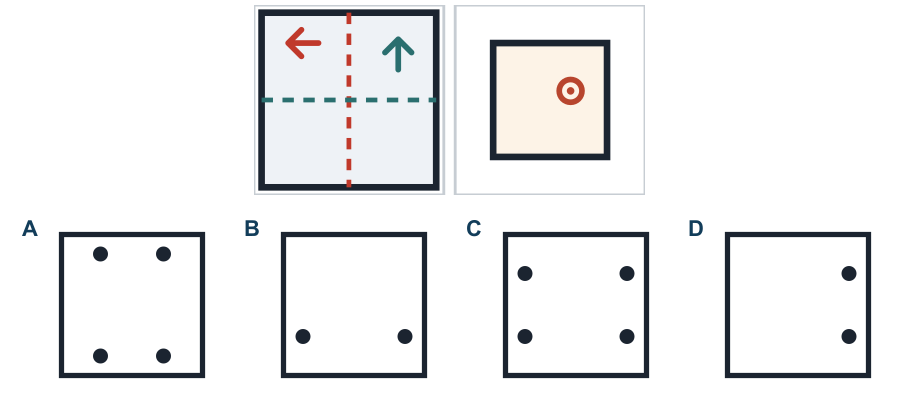
21. A square sheet of paper (10 cm × 10 cm) is folded left to right, and then top to bottom, as shown. A pin is then punched through all the folded layers at the point marked in the second figure, which is 3.3 cm from the vertical fold line and 2.9 cm from the horizontal fold line. If the paper is now unfolded completely, which figure shows the resulting pattern of holes?
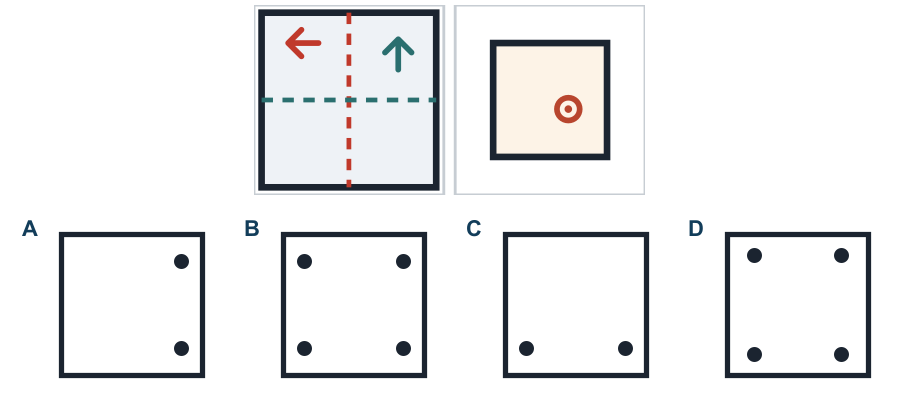
22. A square sheet of paper (10 cm × 10 cm) is folded left to right, and then top to bottom, as shown. A pin is then punched through all the folded layers at the point marked in the second figure, which is 0.3 cm from the vertical fold line and 1.5 cm from the horizontal fold line. If the paper is now unfolded completely, which figure shows the resulting pattern of holes?
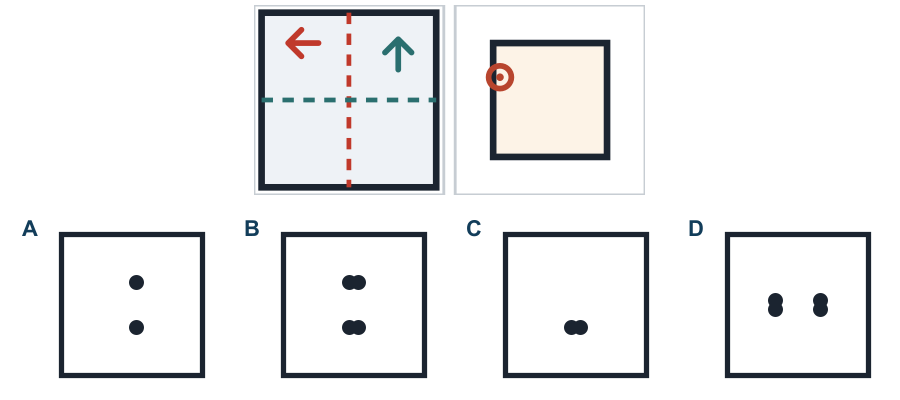
23. A square sheet of paper (10 cm × 10 cm) is folded left to right, and then top to bottom, as shown. A pin is then punched through all the folded layers at the point marked in the second figure, which is 0.4 cm from the vertical fold line and 1.1 cm from the horizontal fold line. If the paper is now unfolded completely, which figure shows the resulting pattern of holes?
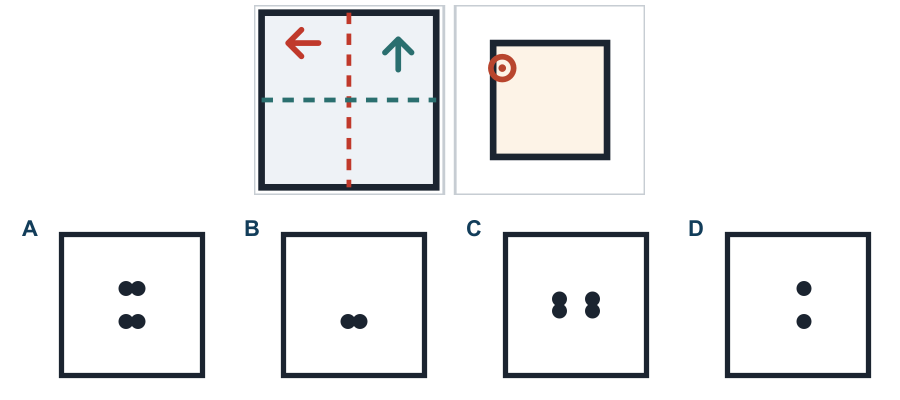
24. A square sheet of paper (10 cm × 10 cm) is folded left to right, and then top to bottom, as shown. A pin is then punched through all the folded layers at the point marked in the second figure, which is 0.9 cm from the vertical fold line and 0.5 cm from the horizontal fold line. If the paper is now unfolded completely, which figure shows the resulting pattern of holes?
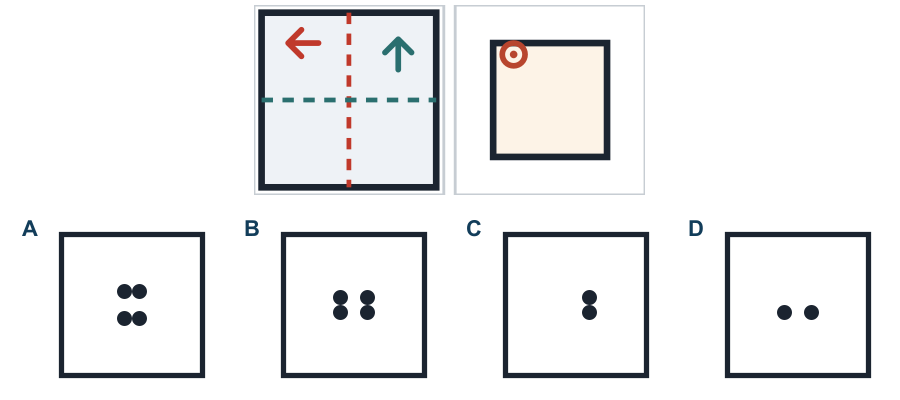
25. A square sheet of paper (10 cm × 10 cm) is folded left to right, and then top to bottom, as shown. A pin is then punched through all the folded layers at the point marked in the second figure, which is 0.4 cm from the vertical fold line and 0.9 cm from the horizontal fold line. If the paper is now unfolded completely, which figure shows the resulting pattern of holes?
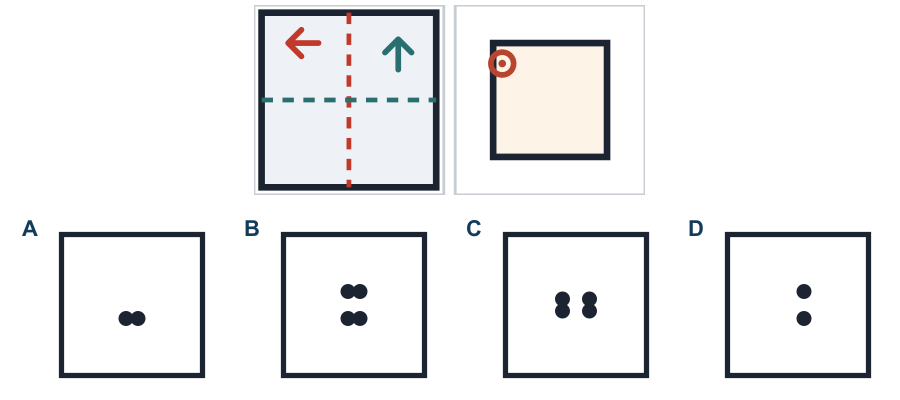
26. Which of the answer figures is the mirror image of the given figure, when a mirror is placed to its right?
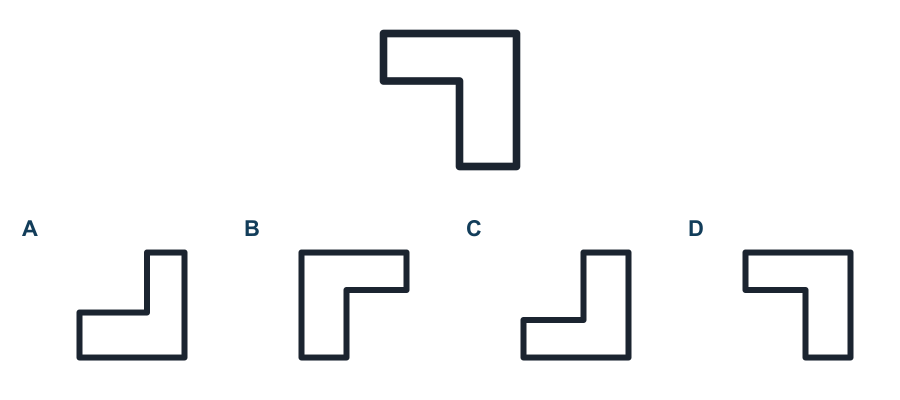
27. Which of the answer figures is the mirror image of the given figure, when a mirror is placed to its right?
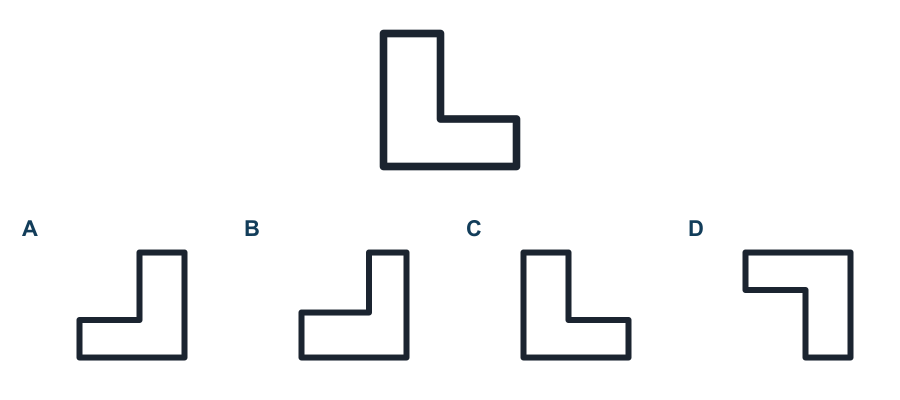
28. Which of the answer figures is the mirror image of the given figure, when a mirror is placed to its right?
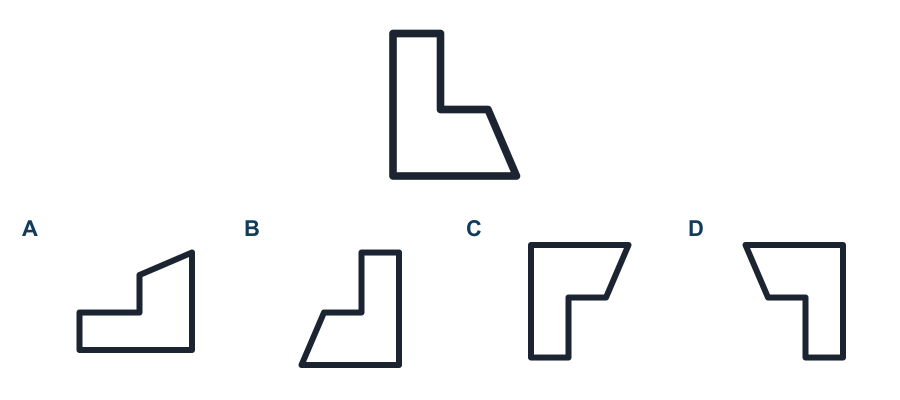
29. Which of the answer figures is the mirror image of the given figure, when a mirror is placed to its right?
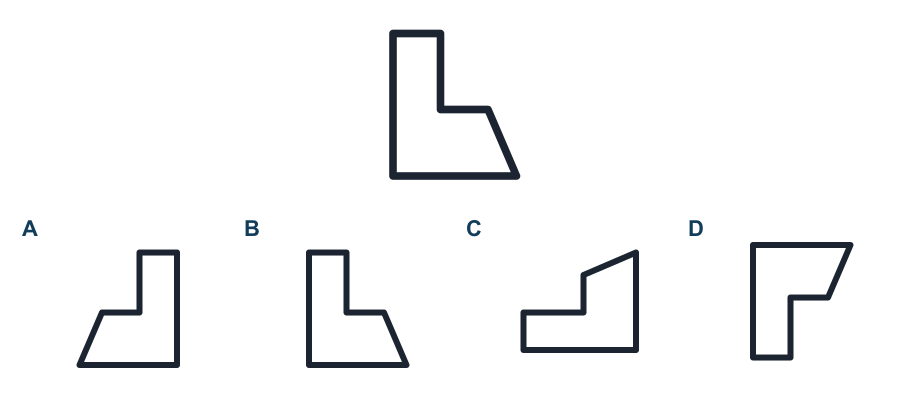
30. Which of the answer figures is the mirror image of the given figure, when a mirror is placed to its right?
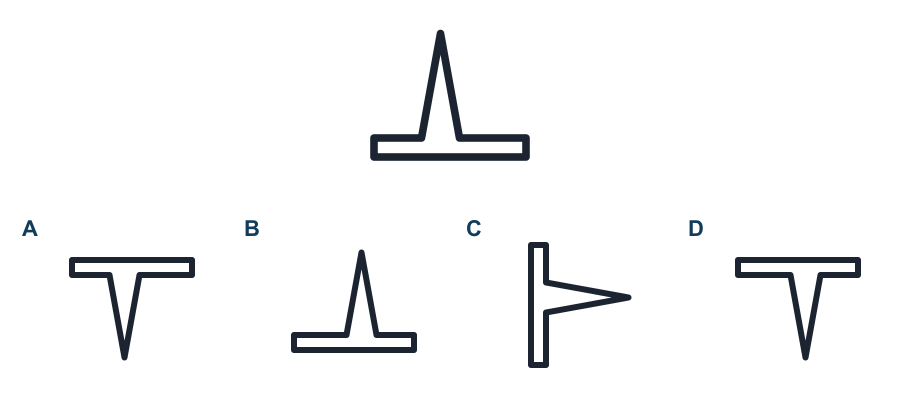
31. Which of the answer figures is the mirror image of the given figure, when a mirror is placed to its right?
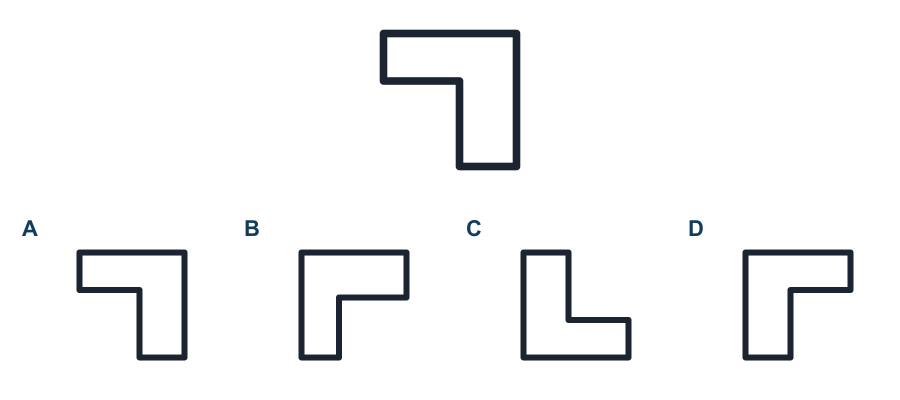
32. Which of the answer figures is the mirror image of the given figure, when a mirror is placed to its right?
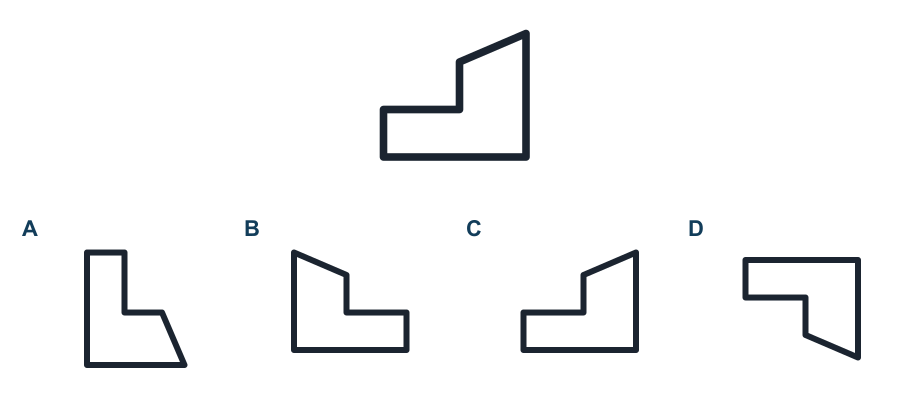
33. Which of the answer figures is the mirror image of the given figure, when a mirror is placed to its right?
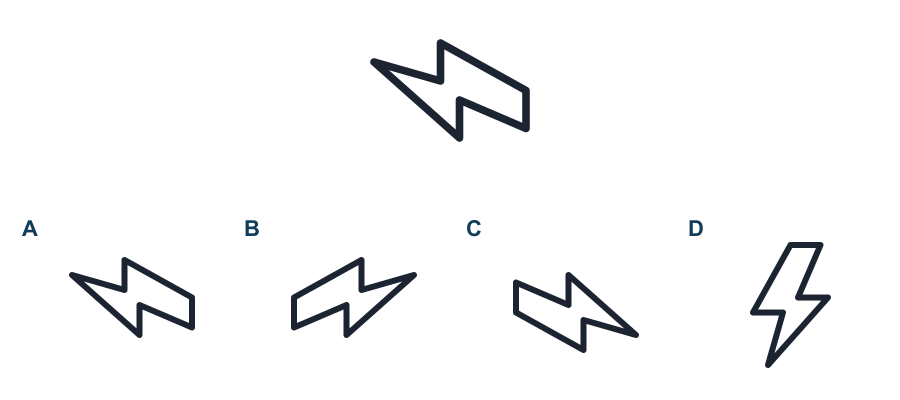
34. Which of the answer figures is the mirror image of the given figure, when a mirror is placed to its right?
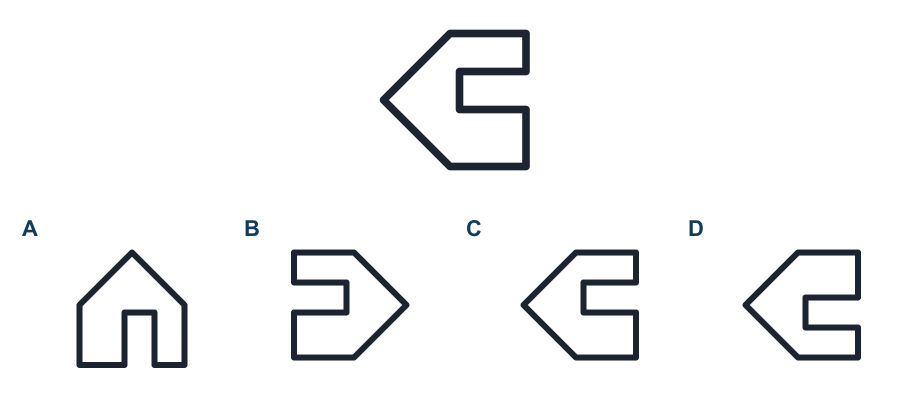
35. Which of the answer figures is the mirror image of the given figure, when a mirror is placed to its right?
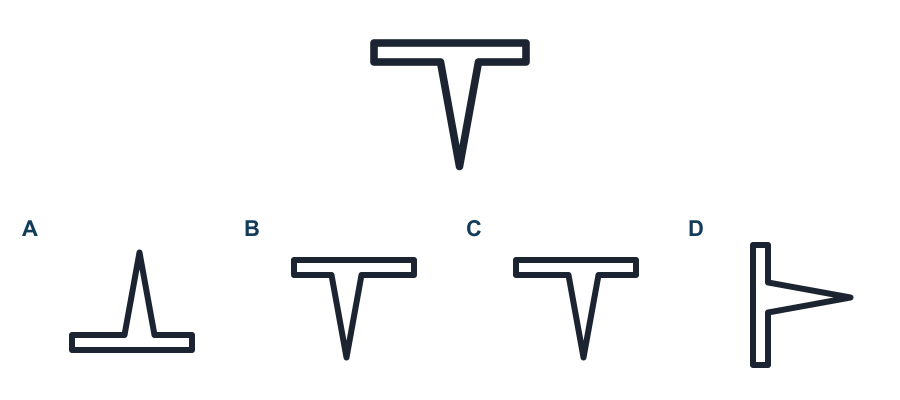
36. Which of the answer figures is the mirror image of the given figure, when a mirror is placed to its right?
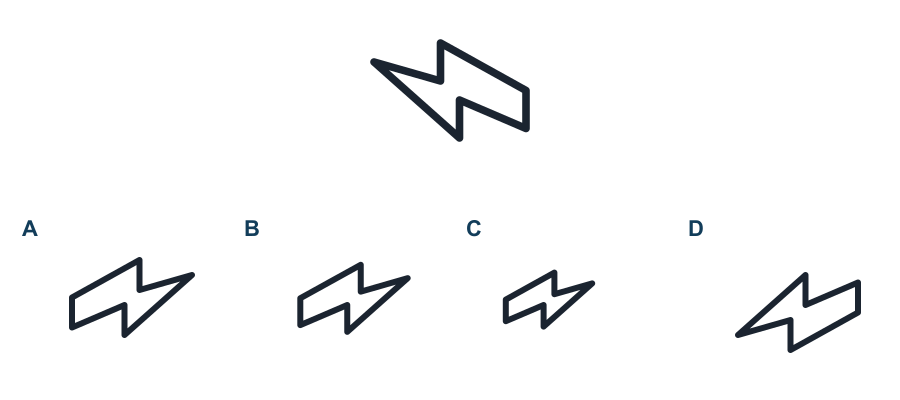
37. Which of the answer figures is the mirror image of the given figure, when a mirror is placed to its right?
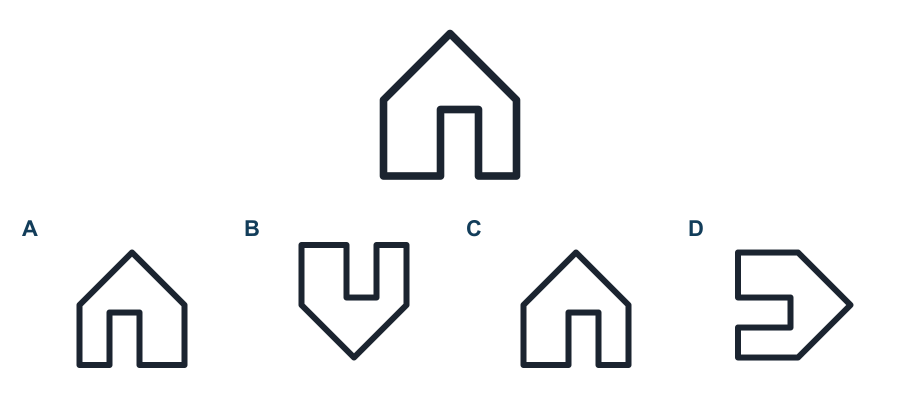
38. Which of the answer figures is the mirror image of the given figure, when a mirror is placed to its right?
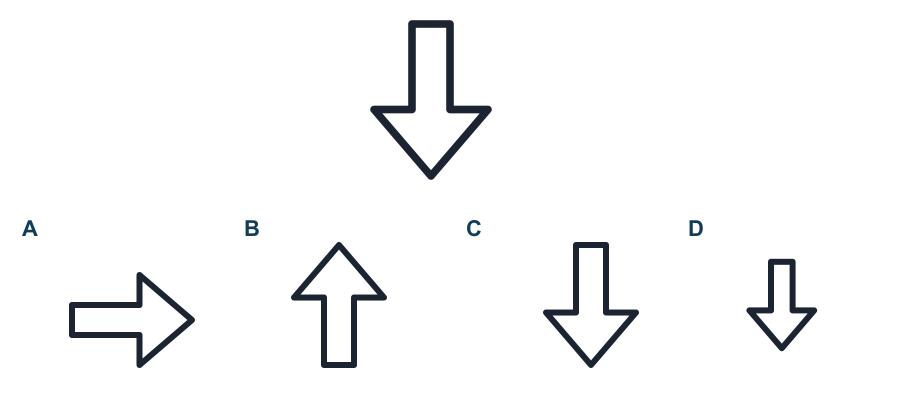
39. Which of the answer figures is the mirror image of the given figure, when a mirror is placed to its right?
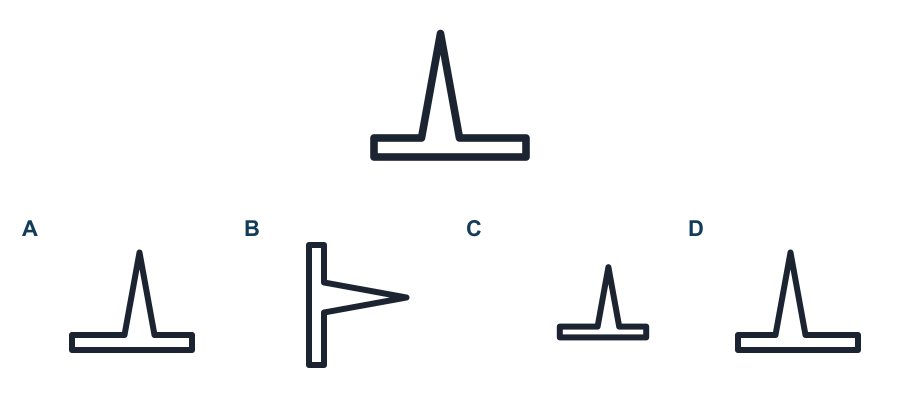
40. Which of the answer figures is the mirror image of the given figure, when a mirror is placed to its right?
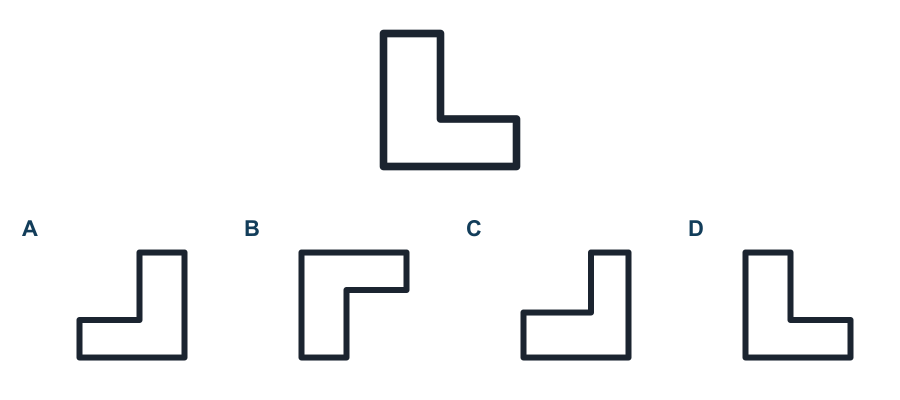
41. Which of the answer figures is the mirror image of the given figure, when a mirror is placed to its right?
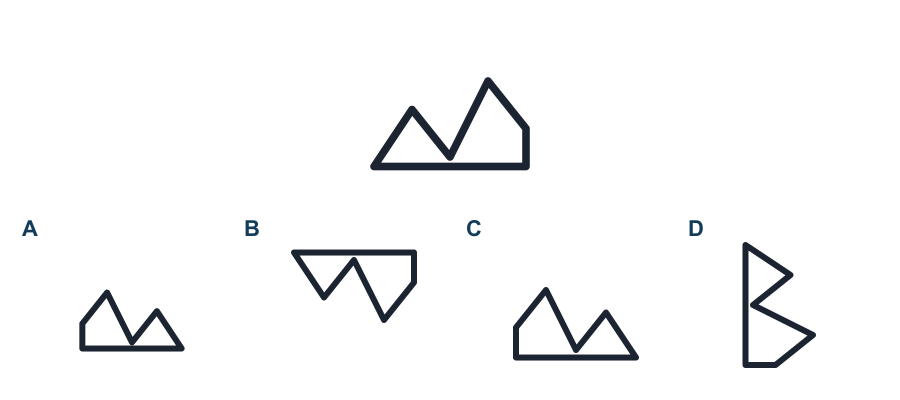
42. Which of the answer figures is the mirror image of the given figure, when a mirror is placed to its right?
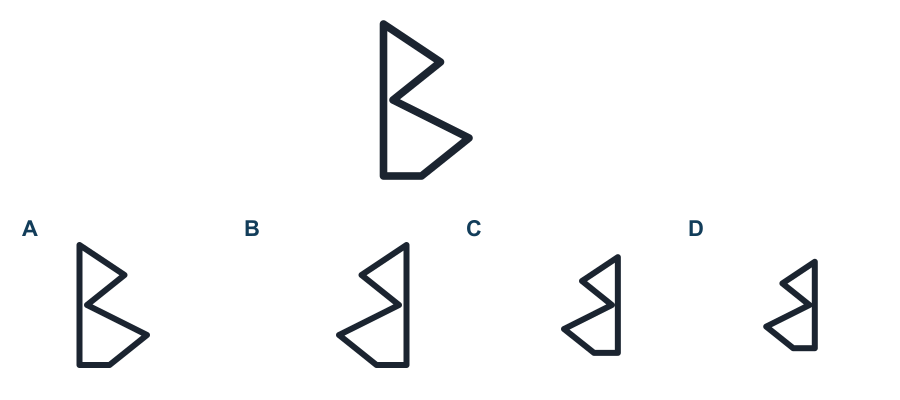
43. Which of the answer figures is the mirror image of the given figure, when a mirror is placed to its right?
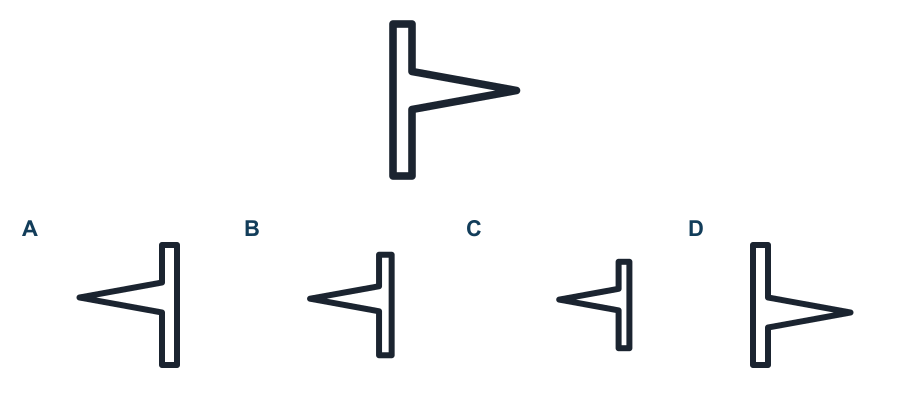
44. Which of the answer figures is the mirror image of the given figure, when a mirror is placed to its right?
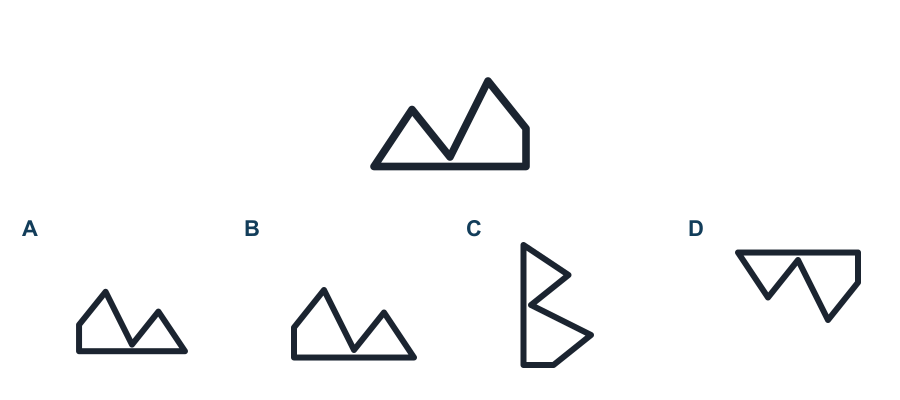
45. Which of the answer figures is the mirror image of the given figure, when a mirror is placed to its right?
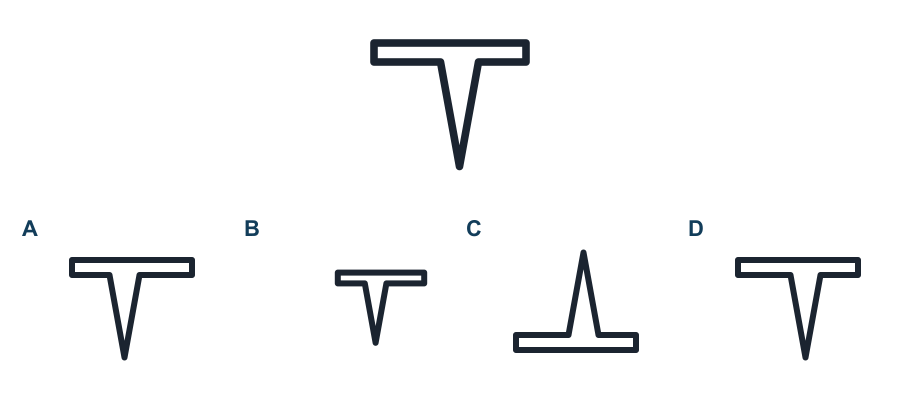
46. Which of the answer figures is the mirror image of the given figure, when a mirror is placed to its right?
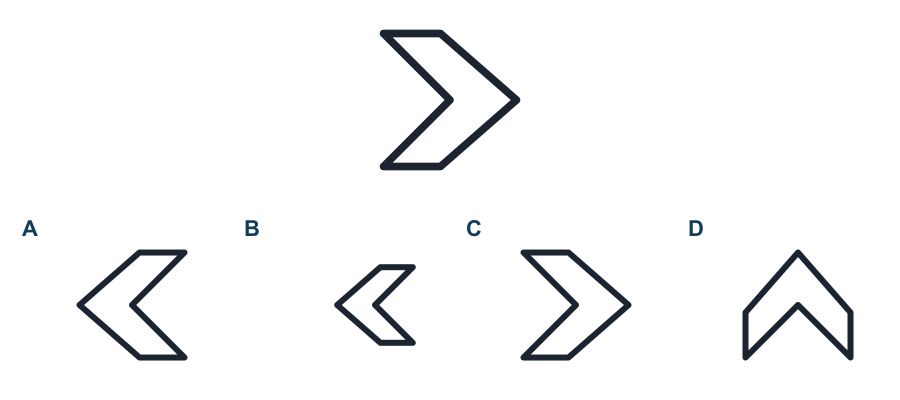
47. Which of the answer figures is the mirror image of the given figure, when a mirror is placed to its right?
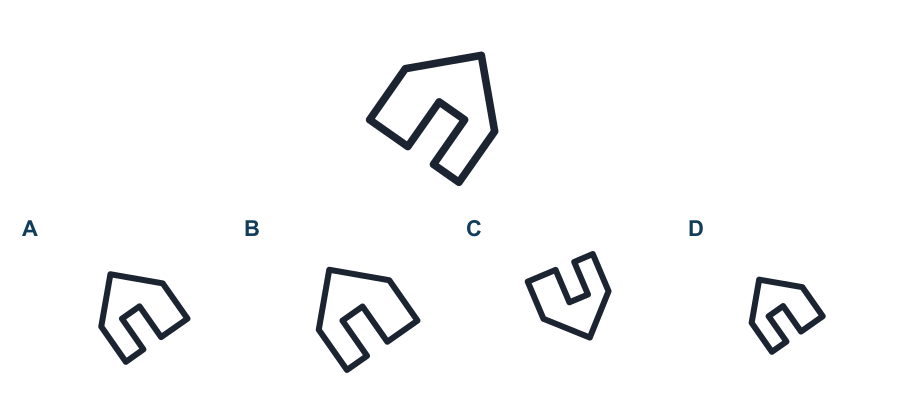
48. Which of the answer figures is the mirror image of the given figure, when a mirror is placed to its right?
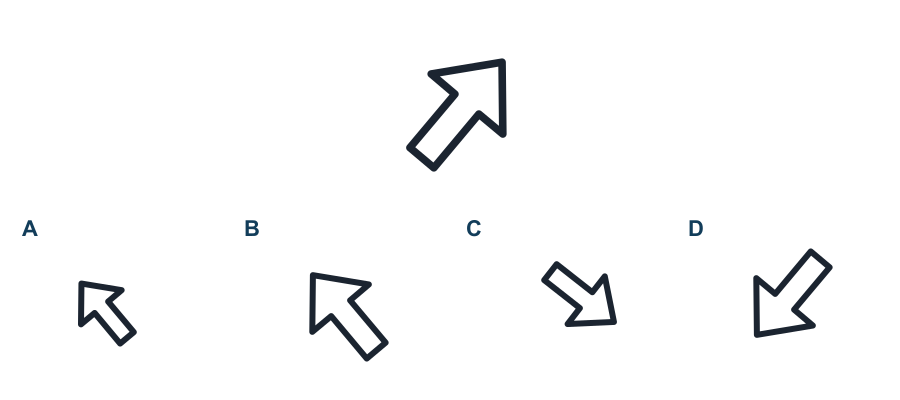
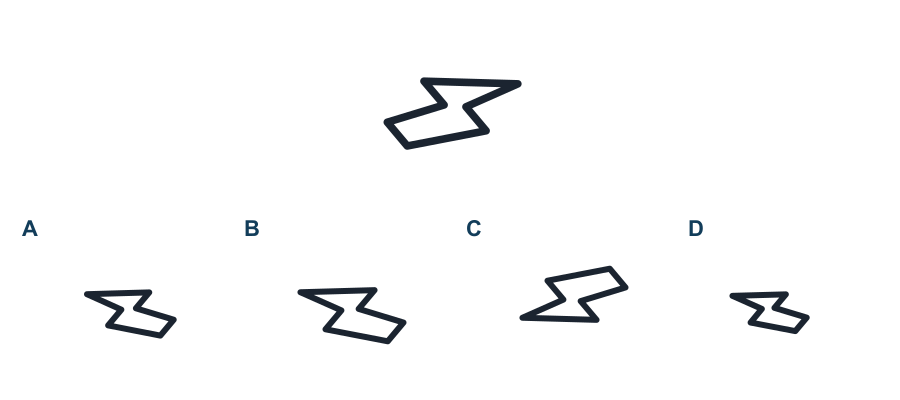
49. Which of the answer figures is the mirror image of the given figure, when a mirror is placed to its right?
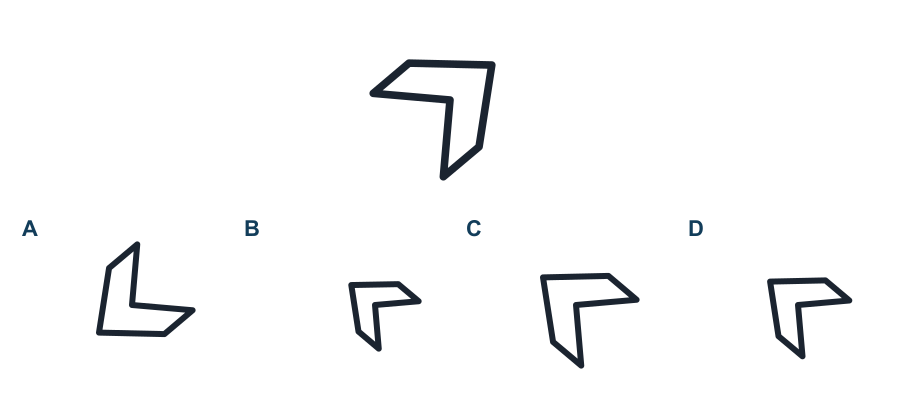
50. Which of the answer figures is the mirror image of the given figure, when a mirror is placed to its right?
Answers and explanations
After checking the key, explain the rule or diagram transformation to yourself before moving on.
1. A. Only one fold was made, along the vertical centre line (axis at the sheet's midpoint). A punch through the folded layers therefore leaves the marked point AND its mirror image across that fold line — exactly 2 holes, related by a single reflection. That is the pattern in the correct option.
APRS26-14-01 | Punch hole — 1 fold | Easy
2. D. Only one fold was made, along the horizontal centre line (axis at the sheet's midpoint). A punch through the folded layers therefore leaves the marked point AND its mirror image across that fold line — exactly 2 holes, related by a single reflection. That is the pattern in the correct option.
APRS26-14-02 | Punch hole — 1 fold | Easy
3. C. Only one fold was made, along the vertical centre line (axis at the sheet's midpoint). A punch through the folded layers therefore leaves the marked point AND its mirror image across that fold line — exactly 2 holes, related by a single reflection. That is the pattern in the correct option.
APRS26-14-03 | Punch hole — 1 fold | Easy
4. A. Only one fold was made, along the vertical centre line (axis at the sheet's midpoint). A punch through the folded layers therefore leaves the marked point AND its mirror image across that fold line — exactly 2 holes, related by a single reflection. That is the pattern in the correct option.
APRS26-14-04 | Punch hole — 1 fold | Easy
5. C. Only one fold was made, along the vertical centre line (axis at the sheet's midpoint). A punch through the folded layers therefore leaves the marked point AND its mirror image across that fold line — exactly 2 holes, related by a single reflection. That is the pattern in the correct option.
APRS26-14-05 | Punch hole — 1 fold | Easy
6. A. Only one fold was made, along the vertical centre line (axis at the sheet's midpoint). A punch through the folded layers therefore leaves the marked point AND its mirror image across that fold line — exactly 2 holes, related by a single reflection. That is the pattern in the correct option.
APRS26-14-06 | Punch hole — 1 fold | Easy
7. A. Only one fold was made, along the horizontal centre line (axis at the sheet's midpoint). A punch through the folded layers therefore leaves the marked point AND its mirror image across that fold line — exactly 2 holes, related by a single reflection. That is the pattern in the correct option.
APRS26-14-07 | Punch hole — 1 fold | Easy
8. A. Only one fold was made, along the vertical centre line (axis at the sheet's midpoint). A punch through the folded layers therefore leaves the marked point AND its mirror image across that fold line — exactly 2 holes, related by a single reflection. That is the pattern in the correct option.
APRS26-14-08 | Punch hole — 1 fold | Easy
9. D. Two perpendicular folds were made (left-right, then top-bottom), both along the sheet's own centre lines. Unfolding reverses both folds, so the punched point maps to all 4 points obtained by reflecting it across the vertical fold line, the horizontal fold line, and both together — the 4 corners of a rectangle centred on the sheet's midpoint. Only the correct option shows all 4 holes at the exact reflected positions; the others are missing a reflection, use the wrong axis, or place a hole off its true mirrored spot.
APRS26-14-09 | Punch hole — 2 folds | Medium
10. D. Two perpendicular folds were made (left-right, then top-bottom), both along the sheet's own centre lines. Unfolding reverses both folds, so the punched point maps to all 4 points obtained by reflecting it across the vertical fold line, the horizontal fold line, and both together — the 4 corners of a rectangle centred on the sheet's midpoint. Only the correct option shows all 4 holes at the exact reflected positions; the others are missing a reflection, use the wrong axis, or place a hole off its true mirrored spot.
APRS26-14-10 | Punch hole — 2 folds | Medium
11. A. Two perpendicular folds were made (left-right, then top-bottom), both along the sheet's own centre lines. Unfolding reverses both folds, so the punched point maps to all 4 points obtained by reflecting it across the vertical fold line, the horizontal fold line, and both together — the 4 corners of a rectangle centred on the sheet's midpoint. Only the correct option shows all 4 holes at the exact reflected positions; the others are missing a reflection, use the wrong axis, or place a hole off its true mirrored spot.
APRS26-14-11 | Punch hole — 2 folds | Medium
12. A. Two perpendicular folds were made (left-right, then top-bottom), both along the sheet's own centre lines. Unfolding reverses both folds, so the punched point maps to all 4 points obtained by reflecting it across the vertical fold line, the horizontal fold line, and both together — the 4 corners of a rectangle centred on the sheet's midpoint. Only the correct option shows all 4 holes at the exact reflected positions; the others are missing a reflection, use the wrong axis, or place a hole off its true mirrored spot.
APRS26-14-12 | Punch hole — 2 folds | Medium
13. C. Two perpendicular folds were made (left-right, then top-bottom), both along the sheet's own centre lines. Unfolding reverses both folds, so the punched point maps to all 4 points obtained by reflecting it across the vertical fold line, the horizontal fold line, and both together — the 4 corners of a rectangle centred on the sheet's midpoint. Only the correct option shows all 4 holes at the exact reflected positions; the others are missing a reflection, use the wrong axis, or place a hole off its true mirrored spot.
APRS26-14-13 | Punch hole — 2 folds | Medium
14. B. Two perpendicular folds were made (left-right, then top-bottom), both along the sheet's own centre lines. Unfolding reverses both folds, so the punched point maps to all 4 points obtained by reflecting it across the vertical fold line, the horizontal fold line, and both together — the 4 corners of a rectangle centred on the sheet's midpoint. Only the correct option shows all 4 holes at the exact reflected positions; the others are missing a reflection, use the wrong axis, or place a hole off its true mirrored spot.
APRS26-14-14 | Punch hole — 2 folds | Medium
15. C. Two perpendicular folds were made (left-right, then top-bottom), both along the sheet's own centre lines. Unfolding reverses both folds, so the punched point maps to all 4 points obtained by reflecting it across the vertical fold line, the horizontal fold line, and both together — the 4 corners of a rectangle centred on the sheet's midpoint. Only the correct option shows all 4 holes at the exact reflected positions; the others are missing a reflection, use the wrong axis, or place a hole off its true mirrored spot.
APRS26-14-15 | Punch hole — 2 folds | Medium
16. D. Two perpendicular folds were made (left-right, then top-bottom), both along the sheet's own centre lines. Unfolding reverses both folds, so the punched point maps to all 4 points obtained by reflecting it across the vertical fold line, the horizontal fold line, and both together — the 4 corners of a rectangle centred on the sheet's midpoint. Only the correct option shows all 4 holes at the exact reflected positions; the others are missing a reflection, use the wrong axis, or place a hole off its true mirrored spot.
APRS26-14-16 | Punch hole — 2 folds | Medium
17. A. Two perpendicular folds were made (left-right, then top-bottom), both along the sheet's own centre lines. Unfolding reverses both folds, so the punched point maps to all 4 points obtained by reflecting it across the vertical fold line, the horizontal fold line, and both together — the 4 corners of a rectangle centred on the sheet's midpoint. Only the correct option shows all 4 holes at the exact reflected positions; the others are missing a reflection, use the wrong axis, or place a hole off its true mirrored spot.
APRS26-14-17 | Punch hole — 2 folds | Medium
18. A. Two perpendicular folds were made (left-right, then top-bottom), both along the sheet's own centre lines. Unfolding reverses both folds, so the punched point maps to all 4 points obtained by reflecting it across the vertical fold line, the horizontal fold line, and both together — the 4 corners of a rectangle centred on the sheet's midpoint. Only the correct option shows all 4 holes at the exact reflected positions; the others are missing a reflection, use the wrong axis, or place a hole off its true mirrored spot.
APRS26-14-18 | Punch hole — 2 folds | Medium
19. D. Two perpendicular folds were made (left-right, then top-bottom), both along the sheet's own centre lines. Unfolding reverses both folds, so the punched point maps to all 4 points obtained by reflecting it across the vertical fold line, the horizontal fold line, and both together — the 4 corners of a rectangle centred on the sheet's midpoint. Only the correct option shows all 4 holes at the exact reflected positions; the others are missing a reflection, use the wrong axis, or place a hole off its true mirrored spot.
APRS26-14-19 | Punch hole — 2 folds | Medium
20. C. Two perpendicular folds were made (left-right, then top-bottom), both along the sheet's own centre lines. Unfolding reverses both folds, so the punched point maps to all 4 points obtained by reflecting it across the vertical fold line, the horizontal fold line, and both together — the 4 corners of a rectangle centred on the sheet's midpoint. Only the correct option shows all 4 holes at the exact reflected positions; the others are missing a reflection, use the wrong axis, or place a hole off its true mirrored spot.
APRS26-14-20 | Punch hole — 2 folds | Medium
21. B. Two perpendicular folds were made (left-right, then top-bottom), both along the sheet's own centre lines. Unfolding reverses both folds, so the punched point maps to all 4 points obtained by reflecting it across the vertical fold line, the horizontal fold line, and both together — the 4 corners of a rectangle centred on the sheet's midpoint. Only the correct option shows all 4 holes at the exact reflected positions; the others are missing a reflection, use the wrong axis, or place a hole off its true mirrored spot.
APRS26-14-21 | Punch hole — 2 folds | Medium
22. B. Two perpendicular folds were made (left-right, then top-bottom), both along the sheet's own centre lines. Unfolding reverses both folds, so the punched point maps to all 4 points obtained by reflecting it across the vertical fold line, the horizontal fold line, and both together — the 4 corners of a rectangle centred on the sheet's midpoint. Only the correct option shows all 4 holes at the exact reflected positions; the others are missing a reflection, use the wrong axis, or place a hole off its true mirrored spot.
APRS26-14-22 | Punch hole — 2 folds | Difficult
23. A. Two perpendicular folds were made (left-right, then top-bottom), both along the sheet's own centre lines. Unfolding reverses both folds, so the punched point maps to all 4 points obtained by reflecting it across the vertical fold line, the horizontal fold line, and both together — the 4 corners of a rectangle centred on the sheet's midpoint. Only the correct option shows all 4 holes at the exact reflected positions; the others are missing a reflection, use the wrong axis, or place a hole off its true mirrored spot.
APRS26-14-23 | Punch hole — 2 folds | Difficult
24. B. Two perpendicular folds were made (left-right, then top-bottom), both along the sheet's own centre lines. Unfolding reverses both folds, so the punched point maps to all 4 points obtained by reflecting it across the vertical fold line, the horizontal fold line, and both together — the 4 corners of a rectangle centred on the sheet's midpoint. Only the correct option shows all 4 holes at the exact reflected positions; the others are missing a reflection, use the wrong axis, or place a hole off its true mirrored spot.
APRS26-14-24 | Punch hole — 2 folds | Difficult
25. B. Two perpendicular folds were made (left-right, then top-bottom), both along the sheet's own centre lines. Unfolding reverses both folds, so the punched point maps to all 4 points obtained by reflecting it across the vertical fold line, the horizontal fold line, and both together — the 4 corners of a rectangle centred on the sheet's midpoint. Only the correct option shows all 4 holes at the exact reflected positions; the others are missing a reflection, use the wrong axis, or place a hole off its true mirrored spot.
APRS26-14-25 | Punch hole — 2 folds | Difficult
26. B. A mirror to the right of the figure produces a left-right flip of every point. Option B is exactly the given figure reflected left-right (mirror image, as with a mirror placed to its right) (the given figure is itself shown rotated by 180 degrees). The other options are: the figure rotated 90 degrees (not reflected); the figure flipped top-bottom (a water image), not left-right; the same figure, unchanged (not reflected at all) — none of these is a true left-right reflection.
APRS26-14-26 | Mirror image — lshape | Easy
27. A. A mirror to the right of the figure produces a left-right flip of every point. Option A is exactly the given figure reflected left-right (mirror image, as with a mirror placed to its right). The other options are: the figure rotated -90 degrees (not reflected); the same figure, unchanged (not reflected at all); the figure rotated 180 degrees (not reflected) — none of these is a true left-right reflection.
APRS26-14-27 | Mirror image — lshape | Easy
28. B. A mirror to the right of the figure produces a left-right flip of every point. Option B is exactly the given figure reflected left-right (mirror image, as with a mirror placed to its right). The other options are: the figure rotated -90 degrees (not reflected); the figure flipped top-bottom (a water image), not left-right; the figure rotated 180 degrees (not reflected) — none of these is a true left-right reflection.
APRS26-14-28 | Mirror image — boot | Easy
29. A. A mirror to the right of the figure produces a left-right flip of every point. Option A is exactly the given figure reflected left-right (mirror image, as with a mirror placed to its right). The other options are: the same figure, unchanged (not reflected at all); the figure rotated -90 degrees (not reflected); the figure flipped top-bottom (a water image), not left-right — none of these is a true left-right reflection.
APRS26-14-29 | Mirror image — boot | Easy
30. B. A mirror to the right of the figure produces a left-right flip of every point. Option B is exactly the given figure reflected left-right (mirror image, as with a mirror placed to its right) (the given figure is itself shown rotated by 270 degrees). The other options are: the figure flipped top-bottom (a water image), not left-right; the figure rotated 90 degrees (not reflected); the figure rotated 180 degrees (not reflected) — none of these is a true left-right reflection.
APRS26-14-30 | Mirror image — flag | Easy
31. D. A mirror to the right of the figure produces a left-right flip of every point. Option D is exactly the given figure reflected left-right (mirror image, as with a mirror placed to its right) (the given figure is itself shown rotated by 180 degrees). The other options are: the same figure, unchanged (not reflected at all); the figure rotated -90 degrees (not reflected); the figure rotated 180 degrees (not reflected) — none of these is a true left-right reflection.
APRS26-14-31 | Mirror image — lshape | Easy
32. B. A mirror to the right of the figure produces a left-right flip of every point. Option B is exactly the given figure reflected left-right (mirror image, as with a mirror placed to its right) (the given figure is itself shown rotated by 270 degrees). The other options are: the figure rotated 90 degrees (not reflected); the same figure, unchanged (not reflected at all); the figure flipped top-bottom (a water image), not left-right — none of these is a true left-right reflection.
APRS26-14-32 | Mirror image — boot | Easy
33. B. A mirror to the right of the figure produces a left-right flip of every point. Option B is exactly the given figure reflected left-right (mirror image, as with a mirror placed to its right) (the given figure is itself shown rotated by 90 degrees). The other options are: the same figure, unchanged (not reflected at all); the figure rotated 180 degrees (not reflected); the figure rotated -90 degrees (not reflected) — none of these is a true left-right reflection.
APRS26-14-33 | Mirror image — bolt | Easy
34. B. A mirror to the right of the figure produces a left-right flip of every point. Option B is exactly the given figure reflected left-right (mirror image, as with a mirror placed to its right) (the given figure is itself shown rotated by 90 degrees). The other options are: the figure rotated 90 degrees (not reflected); the same figure, unchanged (not reflected at all); the figure flipped top-bottom (a water image), not left-right — none of these is a true left-right reflection.
APRS26-14-34 | Mirror image — house | Medium
35. B. A mirror to the right of the figure produces a left-right flip of every point. Option B is exactly the given figure reflected left-right (mirror image, as with a mirror placed to its right) (the given figure is itself shown rotated by 90 degrees). The other options are: the figure flipped top-bottom (a water image), not left-right; the same figure, unchanged (not reflected at all); the figure rotated -90 degrees (not reflected) — none of these is a true left-right reflection.
APRS26-14-35 | Mirror image — flag | Medium
36. A. A mirror to the right of the figure produces a left-right flip of every point. Option A is exactly the given figure reflected left-right (mirror image, as with a mirror placed to its right) (the given figure is itself shown rotated by 90 degrees). The other options are: reflected left-right correctly in direction, but scaled down to about 89% size; reflected left-right, but about a mirror axis shifted from the figure's own edge, distorting its proportions; the figure flipped top-bottom (a water image), not left-right — none of these is a true left-right reflection.
APRS26-14-36 | Mirror image — bolt | Medium
37. A. A mirror to the right of the figure produces a left-right flip of every point. Option A is exactly the given figure reflected left-right (mirror image, as with a mirror placed to its right). The other options are: the figure flipped top-bottom (a water image), not left-right; the same figure, unchanged (not reflected at all); the figure rotated 90 degrees (not reflected) — none of these is a true left-right reflection.
APRS26-14-37 | Mirror image — house | Medium
38. C. A mirror to the right of the figure produces a left-right flip of every point. Option C is exactly the given figure reflected left-right (mirror image, as with a mirror placed to its right) (the given figure is itself shown rotated by 90 degrees). The other options are: the figure rotated -90 degrees (not reflected); the figure flipped top-bottom (a water image), not left-right; reflected left-right, but about a mirror axis shifted from the figure's own edge, distorting its proportions — none of these is a true left-right reflection.
APRS26-14-38 | Mirror image — arrow | Medium
39. A. A mirror to the right of the figure produces a left-right flip of every point. Option A is exactly the given figure reflected left-right (mirror image, as with a mirror placed to its right) (the given figure is itself shown rotated by 90 degrees). The other options are: the figure rotated 90 degrees (not reflected); reflected left-right, but about a mirror axis shifted from the figure's own edge, distorting its proportions; the same figure, unchanged (not reflected at all) — none of these is a true left-right reflection.
APRS26-14-39 | Mirror image — flag | Medium
40. A. A mirror to the right of the figure produces a left-right flip of every point. Option A is exactly the given figure reflected left-right (mirror image, as with a mirror placed to its right). The other options are: the figure flipped top-bottom (a water image), not left-right; the figure rotated -90 degrees (not reflected); the same figure, unchanged (not reflected at all) — none of these is a true left-right reflection.
APRS26-14-40 | Mirror image — lshape | Medium
41. C. A mirror to the right of the figure produces a left-right flip of every point. Option C is exactly the given figure reflected left-right (mirror image, as with a mirror placed to its right). The other options are: reflected left-right correctly in direction, but scaled down to about 83% size; the figure flipped top-bottom (a water image), not left-right; the figure rotated 90 degrees (not reflected) — none of these is a true left-right reflection.
APRS26-14-41 | Mirror image — zigzag | Medium
42. B. A mirror to the right of the figure produces a left-right flip of every point. Option B is exactly the given figure reflected left-right (mirror image, as with a mirror placed to its right) (the given figure is itself shown rotated by 90 degrees). The other options are: the same figure, unchanged (not reflected at all); reflected left-right correctly in direction, but scaled down to about 80% size; reflected left-right, but about a mirror axis shifted from the figure's own edge, distorting its proportions — none of these is a true left-right reflection.
APRS26-14-42 | Mirror image — zigzag | Medium
43. A. A mirror to the right of the figure produces a left-right flip of every point. Option A is exactly the given figure reflected left-right (mirror image, as with a mirror placed to its right). The other options are: reflected left-right correctly in direction, but scaled down to about 84% size; reflected left-right, but about a mirror axis shifted from the figure's own edge, distorting its proportions; the figure flipped top-bottom (a water image), not left-right — none of these is a true left-right reflection.
APRS26-14-43 | Mirror image — flag | Medium
44. B. A mirror to the right of the figure produces a left-right flip of every point. Option B is exactly the given figure reflected left-right (mirror image, as with a mirror placed to its right). The other options are: reflected left-right correctly in direction, but scaled down to about 88% size; the figure rotated 90 degrees (not reflected); the figure flipped top-bottom (a water image), not left-right — none of these is a true left-right reflection.
APRS26-14-44 | Mirror image — zigzag | Medium
45. A. A mirror to the right of the figure produces a left-right flip of every point. Option A is exactly the given figure reflected left-right (mirror image, as with a mirror placed to its right) (the given figure is itself shown rotated by 90 degrees). The other options are: reflected left-right, but about a mirror axis shifted from the figure's own edge, distorting its proportions; the figure flipped top-bottom (a water image), not left-right; the same figure, unchanged (not reflected at all) — none of these is a true left-right reflection.
APRS26-14-45 | Mirror image — flag | Medium
46. A. A mirror to the right of the figure produces a left-right flip of every point. Option A is exactly the given figure reflected left-right (mirror image, as with a mirror placed to its right). The other options are: reflected left-right, but about a mirror axis shifted from the figure's own edge, distorting its proportions; the same figure, unchanged (not reflected at all); the figure rotated -90 degrees (not reflected) — none of these is a true left-right reflection.
APRS26-14-46 | Mirror image — chevronR | Medium
47. B. A mirror to the right of the figure produces a left-right flip of every point. Option B is exactly the given figure reflected left-right (mirror image, as with a mirror placed to its right) (the given figure is itself shown rotated by 35 degrees). The other options are: reflected left-right correctly in direction, but scaled down to about 87% size; the figure flipped top-bottom and then rotated slightly, disguised to look like a left-right mirror image but actually a water image; reflected left-right, but about a mirror axis shifted from the figure's own edge, distorting its proportions — none of these is a true left-right reflection.
APRS26-14-47 | Mirror image — house | Difficult
48. B. A mirror to the right of the figure produces a left-right flip of every point. Option B is exactly the given figure reflected left-right (mirror image, as with a mirror placed to its right) (the given figure is itself shown rotated by 50 degrees). The other options are: reflected left-right, but about a mirror axis shifted from the figure's own edge, distorting its proportions; the figure flipped top-bottom and then rotated slightly, disguised to look like a left-right mirror image but actually a water image; the figure rotated 180 degrees (not reflected) — none of these is a true left-right reflection.
APRS26-14-48 | Mirror image — arrow | Difficult
49. B. A mirror to the right of the figure produces a left-right flip of every point. Option B is exactly the given figure reflected left-right (mirror image, as with a mirror placed to its right) (the given figure is itself shown rotated by 130 degrees). The other options are: reflected left-right correctly in direction, but scaled down to about 84% size; the figure rotated 180 degrees (not reflected); reflected left-right, but about a mirror axis shifted from the figure's own edge, distorting its proportions — none of these is a true left-right reflection.
APRS26-14-49 | Mirror image — bolt | Difficult
50. C. A mirror to the right of the figure produces a left-right flip of every point. Option C is exactly the given figure reflected left-right (mirror image, as with a mirror placed to its right) (the given figure is itself shown rotated by 40 degrees). The other options are: the figure rotated 180 degrees (not reflected); reflected left-right, but about a mirror axis shifted from the figure's own edge, distorting its proportions; reflected left-right correctly in direction, but scaled down to about 85% size — none of these is a true left-right reflection.
APRS26-14-50 | Mirror image — chevronR | Difficult